How to Paint Watercolor Pine Cones (The Easy Way)
The thing about pine cones is they have a very complicated appearance. For this reason they seem like very tricky subjects to paint.
In this article I’ll show you how to simplify the process of painting pine cones in watercolor.
These prickly little things are a great subject for practicing your painting skills. And where I am at this time of the year there’s an abundance of pine cones. They’re easy to find… My garden is cluttered with them !
So next time you’re out and about try collecting a few to set up your own still life composition. Or if you prefer you can download the worksheet and outline sketch for this exercise and paint your own version using the step by step example below.
Related: 10 easy watercolor ideas
Painting Pine Cones in Watercolor
Pine cones can be a daunting subject because they look so complicated.
Here’s an example of what I mean. The overall form of the cone is somewhat similar to an egg. But the whole thing is broken down into a multitude of uneven scales (yep… that’s what they’re called apparently).
The best way to simplify complex organic forms like this is to break the subject down into simple big shapes using the main differences in value as a guide.
(As a quick reminder: value in art simply refers to the lightness or darkness of a given hue).

In the case of this pine cone, it’s easy to see that the outer tips of the scales represent the lightest part of the object. These can be grouped into a single set of light valued shapes, which can be isolated and painted first using a light range of colors.


On the other hand, the inside of the scales is in the shade (darkest values). This part of the cone painting can be considered as one large dark shape. So to complete the painting of the cone you can just fill in the shape in between the tips of the scales using a dark toned mix of paint.

And if you want you can then add more depth to the painting by adding some brush strokes of darker paint to the underside of a few scales.
The whole thing can be done in a few layers of watercolor.

Splitting darks and lights into simple groups of shapes like this is an excellent way to organize your painting process and make your watercolor paintings easier to handle.
In art, this is known as defining the “value structure”.

The hard part is training yourself to recognize differences in values. One trick you can try is squinting at the subject to blur the details, and help you to see the big shapes more easily.
Watercolor Pine Cones – Step by Step

Try this painting for yourself ! Click the button below to download the worksheet for this painting.
The colors I used for this painting were as follows (links to Amazon) :
- Burnt umber – Pigment number: PBr7
- Hansa Yellow Deep – Pigment number: PY65
- French ultramarine – Pigment number: PB29
- Paynes Gray – Pigment number: Pb29 PBk9
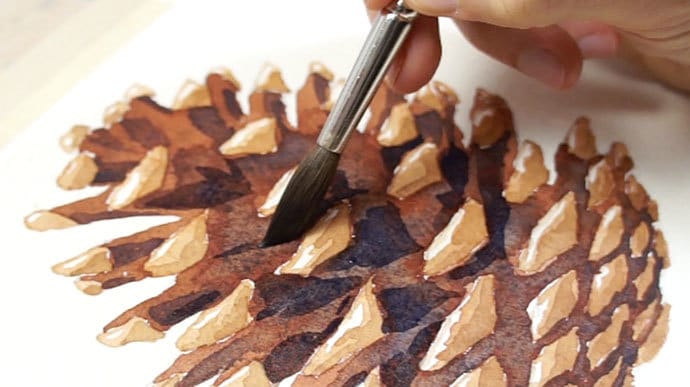
Start by painting the tips of the cone’s scales using a diluted brown color. As you can see I’m leaving a small part of each shape untouched to represent the highlights. This is a watercolor technique known as “reserving whites“.
When the first layer of paint has dried, you can add some more brush marks to the underside of each tip. Painting successive layers of paint onto a dry surface like this is a method called “glazing“.
This helps give a 3-dimensional feeling to the shapes , with the white highlights suggesting the faces turned up towards the light, and the darker glazed brush marks suggesting the shaded faces turned downwards.
Leave the paint to dry again before moving on to the next stage.
Now you can start filling in the rest of the pine cone shape by painting around the tips with a darker toned brown mixture. Treat the whole of the shaded parts as one big shape and paint everything in one go.
I used a medium reddish brown for this layer of color. Then, before the shape has time to dry, I dropped in some brush marks of darker neutral brown to intensify the shaded centre of the cone.
To make a neutral color like this you can start with a brown paint such as Burnt umber and add some of it’s complementary color – in this case I used French Ultramarine (complementary hues are colors that are opposite each other on a color wheel).
Leave the painting to dry completely before adding the final touches.
To intensify the shadows underneath some of the scales I used a mix of French ultramarine with a small amount of burnt umber. This produces a neutral blue mixture, but because this is applied as a glaze over the top of a red hue, the transparency of watercolors allows the two layers to combine to produce a gray appearance. This is one of the characteristics of glazing in watercolors.
In essence, the successive layers of paint merge to produce a new color appearance.

Finally, if you want to add more depth to your cone painting you can add some cast shadows underneath the pine cone using a diluted mixture of gray. To do this, dampen the surface of the paper first so that the gray paint spreads out to produce a nice diffused edge to the shadows.
Now go grab some pine cones !!

Thank you so much for this tutorial! I feel like I was learning so much from your tutorials. You have a gift for not only painting but for teaching. You utilize many methods to convey your message and I think that it is wonderful. I am so happy that I found your blog!
Hi Jess
Happy to help ! Glad you’re finding the blog useful…
happy painting !
Haven’t had a chance to watch the video yet, but your instructions are amazing! Thanks so much for sharing. I’ve been wanting to paint pinecones but they seem so daunting. Can’t wait to try. Thanks again.
Give it a try Karen ! I’m sure you’ll have fun…
Thank you so m much for your watercolor lessons. You break the process down into such clearly explained steps. And thanks for the art terminology in this pinecone lesson, I have painted a few small but amazingly good pieces, thanks to your beginner lessons. I am really enjoying this!
Hi Carol
Glad to hear you’re getting on so well with your watercolors !
Thanks for this exercise. Its pouring down rain today and our state is now back in lock down. Your tutorials and online course has made the current situation much more tolerable. Such a wonderful contribution.
Julie
Happy to share something positive Julie.
Enjoy your painting !
I just watched the video. It’s excellent! So professional and easy to follow. 5 stars! Thank you!
Thanks Chris !
I do my best 🙂
Keep on painting …
Wow! Who knew it could be so sensible? Thanks, Anthony, for simplifying and organizing this task. By the way, I have found your video course for beginners to be just as sensible. Well done!
Hi Fred !
Great news ! Glad you’re enjoying it 🙂
Wonderful step-by-step illustration! I can’t wait to watch the video and try the pinecone in watercolor. Thanks so much for your site that has guided me not only in the selection of some of my artist tools and supplies but also in helping me understand the dynamics around watercolor. Much appreciated
Hi Kim
Thanks !
hope you have fun painting some pine cones …