
Beginners guide how to use watercolor paint tubes
It’s a simple question… Right ?
And the answer probably seems obvious to more experienced watercolor artists.
I remember when I was learning about watercolor painting, I wasn’t sure how other artists used tubes of paint. I found it quite mysterious how to handle paint in this form. And the more I thought about it the more puzzled I became.
I wanted to know the best way to use watercolor paint from tubes.
With a little experience, research, and testing I became more comfortable using paint from tubes, and today I still buy all my paint in this format ! I think this is the best way to use your watercolors.
The bottom line ?
Using tubes is a question of personal choice. It takes some time, trial and error to find the technique which works best with your workflow.
But in general there are a few basic methods :
- You can use fresh paint directly from the tube by squeezing out some paint onto a mixing surface, then mix with water.
- Alternatively you squeeze out some paint into a mixing palette and let it dry between painting sessions.
- Or you can make your own watercolor pans and set up a personalized watercolor palette.
Note: As you’ve probably found out, watercolor paint can be bought in different formats. The most common are tubes or pans. Pans are the small ‘cakes’ of dried paint that can be purchased individually or in box sets of color palettes.
Each individual artist has his own habits, but from what I could discover from other artists workflow and my own personal experience these are the three most widespread ways of using tubes.
Want to know which method is best for you ?
Below I’ll go into more detail about these three methods, plus a few tips and tricks to help you use watercolors in this form.
Here’s what I’ve learned about using watercolor from tubes:
1. Using fresh watercolor from the tube
Some people always use fresh moist paint directly from the tube. This is a very easy and fast way to mix colors because the paint is already moist. In this format it is also easier to mix a large amount of paint if you’re painting on a big surface.
Color from tubes is fully pigmented and saturated. Your paint doesn’t get brighter. So it’s easy to get a strong concentration of paint.
Using fresh paint from the tube every time you paint has the advantage of starting with clean fresh colors each time. Some artists like to have fresh pure colors when they start a new painting. They don’t want their colors to be stained with other pigments, so this method of working suits them well.
Starting afresh in this way also means that your mixing surface is clean and free from dust, so you don’t get foreign bodies floating around in your watercolor washes!
Here’s how this technique tends to work:
How to mix watercolor paint from tubes
- You start with a clean mixing surface. This can be a mixing palette, or even just a dinner plate. A lot of artists use a butcher tray. (When choosing a mixing surface you should look for something impermeable such as plastic, ceramic or enamel, with a very white surface so you can accurately see the color of the mixture you’re making).
- Squeeze out a dot of the color you want to use onto your mixing tray or into the wells of your palette. If you’re using a mixing surface leave plenty of space between dots to avoid color contamination. Most artists put their dots around the edge of the mixing area. This way you leave room in the middle for mixing puddles of paint. (To prevent color contamination the actual mixing takes place in a separate area on your tray).
- Load a brush with clean water and press it against the mixing area to create a puddle of water.
- Dab your moist brush onto a dot of paint to pick up some pigment.
- Gently mix the paint into the water puddle until the mix is smooth.
- Rinse your brush then repeat these steps to create additional puddles for mixing.
- Clean off the mixing palette when the painting is finished.

A few tips:
When you start a new painting, begin with just a few colors. Quite often as you progress with a subject, you might change ideas and decide to use a different color design. My advice is to squeeze out only the colors you need to avoid wasting paint.
In the beginning you may be tempted to dab a dirty brush into your pure paint dots. It takes a bit of discipline to keep you mixing habits clean and avoid contaminating your pure pigments, but with experience your technique becomes more intuitive.
How to open watercolor tubes
“Just open the cap” I hear you say !
This might seem obvious but sometimes opening new or old tubes of paint can cause problems.
With new tubes it’s quite common to see a sudden gush of paint when you take off the cap for the first time. Used tubes don’t seem to encounter the same problem.
Just be careful when opening new tubes. Try not to put pressure on the tubes by squeezing them, and maybe open them over the well of your palette so you don’t lose any contents.
When you open used tubes, sometimes you can get flakes of dried paint fall out. Try to avoid the flakes falling on your clean paper or in your mixing palette.

Old tubes are another sticky problem. Often if you leave them for a while the paint dries and the cap becomes difficult to remove. The solution to this is to warm the cap in some way. Leaving paints “cap down“ in some warm water usually helps.
If you encounter this problem often, you might consider dipping the inside of your cap in some glycerin or even honey before putting the cap back on. (Glycerin is used in paint formulas to help keep them soft).
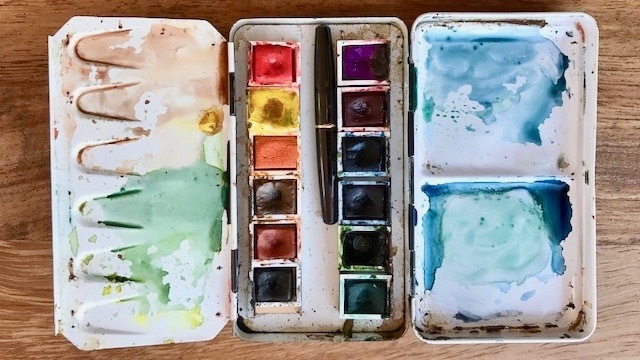
2. Squeezing tubes into a mixing palette
With this approach you let the paints dry out in a mixing palette when not in use. You need to reactivate the paint with a small amount of water each time you use them.
A mixing palette is different to a simple mixing surface like a butcher tray or a ceramic dish. A mixing palette has two distinct parts:
Paint wells for squeezing out your pure paint.
A mixing area for mixing your paint puddles.
There are a lot of different formats of mixing palettes and over time you’ll find one which you prefer. (After a lot of testing I found one of the best types is an Eldajon palette – you can find them at a good price on Amazon).

The advantage I have found with this method is that there is very little wasted paint. Reconstituting the dried paints with water is very easy, and there is no loss of pigment saturation ( At least that’s the case with the brand of paints that I use – see my recommendations ).
Clean up time is also reduced !
Here’s how people tend to work with palettes:
- Squeeze out dots of raw tube paint into the palette wells. Just before painting you can add a few drops of water into each well. This makes the actual colors easier to see than the dried paint, and prevents paint from developing a skin during your painting session. No need to mix the paint in the wells, just leave the dot of concentrated paint for when you want to mix a higher saturated color.
- It’s a good idea to arrange your palette by grouping paints into color families. This helps you locate hues more easily during the painting process. I usually do this in the order of the color spectrum.
- Creating puddles of mixed color is done in the same way as described above. The paint wells on most palettes are quite close together, so keeping your brush clean when picking up pigment is important, and try not to splash color into adjacent wells.
A few tips:
When mixing colors, bring out a bit more paint than you think you need. There’s nothing as frustrating as running out of a color mix and having to mix the exact same color twice.
Paint will dry out in the palette when not in use. To reactivate the watercolors just add some clean water to the wells before each new session. A lot of artists use a spray bottle to pre-wet their paint.
If your paint wells do become color contaminated or muddy, then just place the wells under a flow of warm running water. The surface layer of muddy color will dissolve leaving fresh paint underneath.
One of the problems with this method is the risk of dust or particle contamination between painting sessions. Depending on the type of palette used, I find it useful to cover the palette until my next painting. This can be as simple as an upturned dinner plate, or aluminium foil. Whatever you find does the job well.
Depending on how long you leave your mixing palette between each new painting, it might be advisable to put them in the refrigerator for storage, to prevent mold and evaporation.
I just wanted to add a quick note about the term ”palette”. In watercolor painting this term tends to refer to a few different things. This got me quite confused in the beginning but there’s an important distinction.
First you have a mixing palette. This is the surface on which you mix your paint. There are loads of different types but they usually have paint wells for holding the pure paint, and a mixing area for blending paints together.
Then you have palette boxes or tins. Some of these are empty tins with wells for storing paint from tubes. Others are boxes containing pan paints, and can be empty or ready-filled.
Just to make things a bit more confusing, watercolor artists will often talk about their “palette” when discussing their palette colors. This simply refers to the range of colors they use.
Bewildered yet ? … Don’t worry, you’ll get used to it !
Watercolor palette with lid
Some artists prefer to keep their fresh tube paints continuously wet.
They use a “wet palette” option to keep them moist.
This method combines the advantages of working with fresh paint plus the ability to create a personalized color palette. It eliminates the trouble of dissolving paint at the beginning of each session, making mixing quick and easy.
You can find special wet palette boxes with folding or snap on lids to accommodate your tube paints (see the reviews for this leakproof palette on Amazon). They have the advantage of being watertight and transportable.
They have a lid that prevents overnight evaporation and works as an effective dust cover.

The drawback is that wet paint can go mouldy if left too long. Keeping them in the fridge will help !
3. How to make watercolor pans
Tubes of watercolor can be used to make your own watercolor pans.
You can of course buy paint already in pans (sometimes called cakes), but I prefer to fill empty pans with my favorite paint colors.
This is really easy to do (In fact it’s a piece of cake… sorry, couldn’t resist that !)
All you need is an empty palette box and some empty pans.
Pans come in two sizes: bigger full pans and small half pans. Personally I prefer the full pans, simply because it’s easier to get the whole of my brush into the large pan when picking up paint.
Most palette boxes will fit both full and half pans.
I think this option is great ! Firstly it let’s me set up a personalized color palette, (ready-made box sets always include colors you don’t want). Also you can layout the colors the way you want. This is good for your workflow because you have an established order fixed in your mind. I also think it’s more cost effective than buying ready-made pans. I can fill up a pan and keep them topped up 3 or 4 times with tube of paint. For me, the price difference between a pan and a tube makes the tube a more economical choice. Storage is easy. When you’re finished you just close the lid, which also keeps the paint free from dust.
Here’s how to make your own pans and setup a palette:
- Decide which colors you want to put in your palette.
- Label the pans with the color name, brand and pigment number using a waterproof pen. This is handy for when you want to refill a pan later on.
- Before opening, shake or massage the paint tube, especially if they are old. Sometimes the binder (usually gum arabic) can separate from the paint when stored for long periods.
- chevron-rightBegin by squeezing some paint into the corners of the pan. Fill the pan about half way then stir the paint with a toothpick or an unfolded paperclip. This stirring seems to consolidate the paint and remove any trapped air, which avoids cracks in the paint when drying.
- chevron-rightLeave the pan to dry. Don’t cover the pans, leave them to dry in a well air place.
- chevron-rightOnce dry, fill the rest of the pan and stir again. I don’t fill the pans right up to the top. This is useful because you can add a few drops of water to your pan to reactivate them before painting. Also this helps prevent the paint sticking to the lid of the palette box when I close it.
- chevron-rightThe process of filling in two stages seems to avoid the paint cracking and falling out of the pan. The amount of evaporation and cracking varies depending on the brand of paint, but the Daniel Smith paints that I use dry beautifully. If you do find your paint falling out, try adding a drop of glycerin to the bottom of a pan to stick it back in.
- chevron-rightOrganize your pans according to color families as you would with an open palette. This is just good habit and helps your workflow making it easy to locate hues.
- chevron-rightTo reactivated the paint add a few drops of clear water with a brush or a spray bottle.
Using tubes to make pans makes no difference to the quality of your watercolors. Manufacturers use the same formulas to make the pans and their Tubes of paint. Tubes just have more liquid binders and fillers which evaporate when you leave them to dry.
How to recover dried watercolor paint tubes
Do you have some old watercolor tubes that have dried out over time ? Are they completely useless ?
There doesn’t really seem to be an expiry date for watercolors paints. I’ve heard of artists leaving tubes for several years and still being able to use them!
Dried up paint tubes can be reconstituted by removing the paint from tube and adding gum arabic or even a little water.
Cut open the tube, then crush or chop the contents into small parts. Put the dried paint into a container with a little gum arabic and leave to rest a while. Stir the paint and add more gum arabic until you recover a smooth mixture.
The whole process needs a lot of patience, but it can be done !
Using watercolor straight from the tube for spot color
Finally, for painting detail, or spot colors, I simply work straight from the tube. Unscrew the cap, wet the brush with just enough water to lubricate the pure paint, then pick up some paint straight out of the tube.
This is usually when I’m using a color that I don’t keep in my day to day palette, or for occasionally applying opaque colors such as Chinese White.
Comparison between watercolor tubes and pans
One of the advantages with tubes is you can start with a limited palette – buy a few tubes at a time and add to your collection as you evolve.
The choice between tubes or pans is more a matter of personal workflow. I find myself using both, but I always buy tubes first, and make my own pans as I need them.
Whether you buy your paints in tubes or as pans will not affect the quality of your work. The paint is the same. Tubes are more pricey but in my experience they are more economical compared to buying ready filled pans.


I wasn’t paying attention to what I was doing and ended up buying some tubes of watercolors instead of acrylics. No problem, a new medium to work with. But I didnt know how to use them. This was exactly what I wanted. I will be exploring more now. Thank you.
Have fun with your new watercolors Faith 🙂
Thank you for your information–very helpful for beginners! I wondered… I was gifted a set of 6 tubes of watercolor paint…. Could you point me in the direction of what to do next? Should I mix some colors myself by adding for example blue and red?
Hi Ann
You could try making a mixing chart using all of your paints to test the range of color mixing possibilities (see this page for guidance)
Thank you for taking the time to provide all of this information. I’m just starting out with watercolors and this was incredibly helpful. Thank you!!!
I love your site and all the useful information you have. I just have one question on this topic and the would be what the difference is between using tube paint to make “pans” (#3) or squeezing the tube into “wells” of a palette (#2) and letting both dry out. You mention putting #2 in the fridge to prevent mold. I hope this makes sense.
Hi Dawn – making pans or squeezing paint into the wells of a palette produces essentially the same result. The difference is the type of palette you prefer to work with. For example, I have a large John Pike palette with wells that I use I my studio, but for traveling I have a metal folding palette with pans. Hope that helps !
Thank you!
So clear and concise, and with such insight into our beginners’ problems.
Thanks Anne – glad this was useful !
I have been using pan paints and got a set of Winsor Newton Cotman 20 x 5 ml (0.17) tubes for a gift. As a beginner I like to follow along with the colors the watercolour artist I’m following is using. Is it best fill all the wells on my palette with the colors and let them dry or to just squeeze out the colors I’m intending to use?
Hi Vivian
Most artists fill a palette with a versatile set of colors then let them dry.
The if there is a very specific color you need you can always squeeze some onto the palette.
For example see this article
hope that helps 🙂
This was very helpful
I am a real beginner. I want to know how to mix thickness or consistency either the paint from tube is thick or when you add water it’s thin
I can’t seem to figure out how to make a medium consistency or how to mix 30-10-60% to make certain colors. I know it will come in time. But it’s confusing
Hi Mary
Perhaps you could try painting some watercolor value scales…
Thank you so much. This is the best information I’ve heard in my search for how to begin learning the how’s and whys of watercolor. Very clear and concise..
Thank you for your posts! Beginner here and finding them all very detailed and helpful!
My tube paints drip all over the pace when I put my palette in my bag. What is the remedy for this please?
Hi John
Some watercolors use honey as a humectant in the paint ingredients. This type of paint dries very slowly or may even remain continuously moist.
You might want to try an airtight palette such as the one mentioned above.
Happy painting !
Great information for us beginners! Thank you!