
Easy Watercolor Paintings for Beginners
Practice makes perfect… Right ?
I find that it’s just as true with watercolor painting as it is with anything else.
I get a lot of pleasure painting even simple patterns with watercolors. Each time I pick up a brush and start painting I feel like I’m getting to know my paints a little bit better.
Getting started with watercolors should be about happy experimentation and learning. That’s why I’ve put together these easy watercolor paintings for beginners. Below you’ll find detailed descriptions of five simple painting projects, each slightly more difficult than the last:
- Easy Geometric Watercolor Pattern
- Simple Watercolor Circles Painting
- An Easy Watercolor Still Life.
- Beginners Line and Wash Eucalyptus Branch
- Simple Watercolor Pebbles Composition
As well as being an excellent way to improve basic skills, I’ve tried to make these simple paintings an opportunity to develop your knowledge about watercolor techniques and painting theory. There are so many interesting things to learn about this medium – color mixing, laying washes, building glazes, wet in wet or texture effects are just a few examples. I’ll explain in more detail the different techniques used for each of the paintings below.
So grab your paint brushes and a cup of coffee, and get stuck in !
1. Easy Geometric Watercolor Pattern

Things you’ll learn: mixing colors, color harmony, wet on wet and glazing.
Painting shapes and patterns can be very rewarding. For me it’s a kind of abstract painting which can produce very aesthetic results. It’s also a great way to learn brush control, color mixing, and how to create interesting color harmonies.
Mixing colors in the palette is one of the things I used to struggle with. Getting just the right hue can be tricky until you become familiar with the basics of color mixing.
You probably remember from art classes at school, in theory you can mix any color you want using the three primary colors, yellow, red, and blue.
But life would be too easy if that was always true, and watercolor mixing turns out to be a bit of an art form in itself.
Mixing greens is one of the colors that newcomers find particularly challenging. When you mix yellow and blue watercolor paints you can get some pretty surprising greens! For example, take a look at what happens when you mix Cobalt blue with New Gamboge.

Both of these colors are warm (they contain a small amount of red). When mixed they produce a desaturated green. This would be a good green color for a landscape painting or for foliage. But if you want a bright vivid green we need to mix differently.
Here’s the result you get when you mix Cobalt blue and Lemon Yellow(Lemon yellow is a cool hue). The colors are brighter and more vibrant.

For this exercise I used Cobalt blue and Lemon yellow for a nice range of bright colors.

The color palette I’ve chosen for this easy watercolor painting project uses analogous colors. These are colors which are close to each other on the color wheel and they tend to produce a smooth gradient of color and a harmonious design.

This is also a good occasion to familiarize yourself with how the wetness of the paint effects the blending of colors on the paper. This painting involves a couple of techniques which produce quite different results.
The first is wet on wet. The name of this method is pretty explicit. It means applying wet paint onto a wet surface. This can be paper which has been pre wetted with clear water, or it can mean adding paint to a previously laid wet wash.
The second technique we can try is glazing. Glazing means painting successive layers of color on top of dry paint. The layering of one color on top of another is a kind of color mixing. Glazing in this way creates new hues thanks to the transparency of watercolors.
Mix up some wet blue and yellow paint and tape down some watercolor paper to a flat board. Pick up some paint and begin laying down brush marks. Paint a rough square of color and then another, changing colors as you please.
Watch what happens when you lay a brush stroke which touches a previous wet wash of color. You’ll see colors bleeding together to create interesting new blends. This is what happens when you paint wet on wet.

If the previous wash has dried and you cover it with a new brush stroke you should get a layering effect. Because of the transparency of watercolors the underlying shape shows through and a new color is “mixed” where the two shapes overlap. This is known as glazing.
Let the watercolor make its own beautiful effects. Continue painting random shapes and mixing blue and yellow together to make some attractive greens until you’ve filled the page.
2. Simple Watercolor Circles

Things you’ll learn: brush control and dexterity, more color theory & glazing.
Here’s another example of an easy watercolor painting with geometric shapes.
This particular example involves some simple circles. But don’t be fooled by the apparent simplicity of this project. Painting perfect round forms with a brush is actually a lot trickier than it looks! This is good training for dexterity with a brush.
I’ve chosen to use a blue and red-orange color scheme for this painting. These two colors are known as complementary. Complementary colors are pairs of hues which are on the opposite side of the color wheel. This combination of colors creates a strong contrast and is considered lively and vibrant.

I’m using Prussian Blue and Transparent Pyrrol Orange for my painting. I really love these two colors together. The Daniel Smith range of paints are easily the best watercolors I’ve ever used. They mix incredibly smoothly and lay down perfectly on watercolor paper. If you want help choosing your paint, take a look at my recommendations here… Or if you’re looking to test professional watercolors for the first time, Daniel Smith do an Essentials introductory set which is well worth the investment (links to Amazon).

Begin by sketching out some circles or rings on your watercolor paper. This is optional but I usually like to start with a pencil sketch to guide me otherwise the results are more approximate. Make some of the circles overlap as in my example.
Begin painting the colored circles, moving your brush in a circular motion as smoothly as possible. Turn the paper if you need to. Continue painting as many of the rings as you can without painting any overlapping rings. Leave your work to dry before moving on.

Paint a new series of rings, this time painting over the first set of circles. The transparency of the paint lets the underlying layers show through and the tone of the colors is intensified. This is a perfect example of glazing.

The translucent nature of watercolors incites artists to work from light to dark. It’s rare to get a deep tone with a single layer of paint. To get a full range of values you may need to glaze a new layer a third or fourth time.
Continue adding circles, making sure that your paint is dry before applying a new layer. Add a few blue circles to finish off the project, and to test the color appearance when you glaze with a different color.
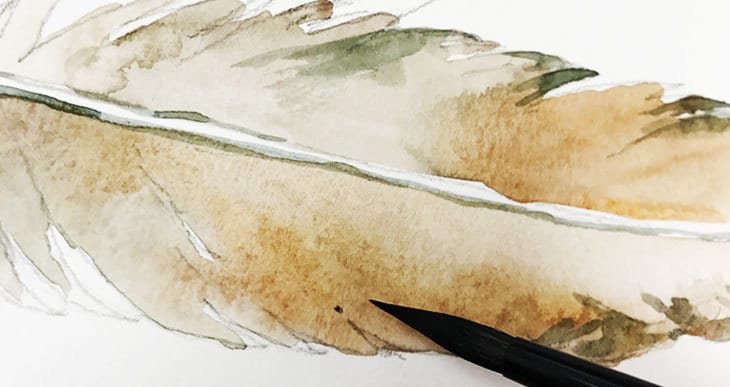
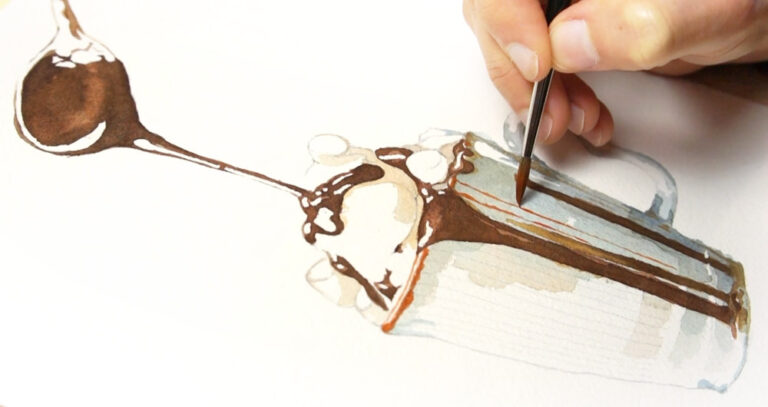
3. An Easy Watercolor Still Life.

Things you’ll learn: brush control, layering and variegated washes.
This next project moves away from abstract subjects to real life objects. It’s a painting of a feather. This remains an easy watercolor for beginners because it is flat, and doesn’t need any complex shading or three dimensional representation for it to look good.
This kind of subject is good because it helps to push your drawing and painting skills a little bit further than the previous exercises. The idea is to paint the feather using mostly wet on dry techniques.
The colors used for this project are quite simple. A range of greys and browns mixed from Burnt Sienna, Raw Sienna , and Prussian blue.

Paint the first wash as a light toned variegated wash. A wash is an evenly painted area of color where the individual brush strokes can’t be discerned. Variegated simply means smoothly blending two or more colors. Start painting with a warm brown-grey wash using a mix of Burnt Sienna and Prussian Blue. To this wash add some Raw Sienna to create the variegated effect. This creates a wash which is full of interesting color and varied tone.

Leave the first wash to dry completely and you’ll be able to add detail by glazing a new color over the initial wash. I mixed a blue-grey color using the same Burnt Sienna and Prussian Blue, only I added more blue to the mix. This wet on dry method of painting produces hard edges and is ideal for adding details to paintings.
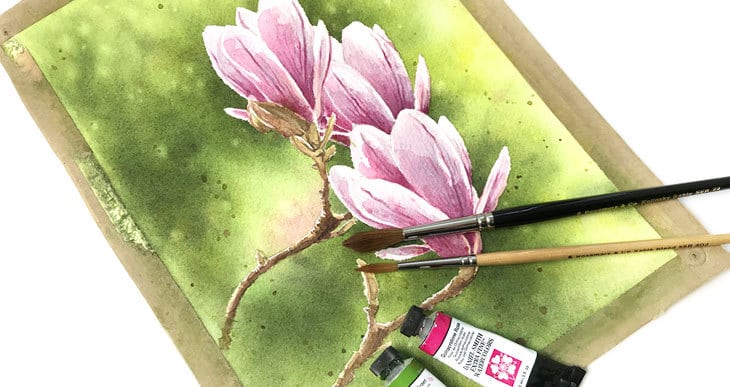
4. Beginners Line and Wash Eucalyptus Branch

Things you’ll learn: line and wash technique, color mixing.
Here’s another popular still life subject. I seem to see paintings of eucalyptus branches everywhere at the moment, so I thought, why not include one here.
This painting was done with a line and wash technique which is where you combine watercolors with ink pen drawing. Line and wash (otherwise referred to as watercolor and ink), is a great way to begin with watercolor painting. The technical aspects of watercolor become less important because the subject is well defined by your ink sketch first. You only need to add some simple washes of color to embellish your work.
Eucalyptus leaves have a slightly blue-green tint. To mix the colors for this painting I’m using greens made from Raw Sienna with Phthalo Blue, and Raw Sienna plus Phthalo green. These are the only three colors you’ll need.
With this method you can add as much pen work as you like, but we’ll just be adding simple lines to help emphasize the outline and details of the branch.
I always begin with a pencil sketch. The pen drawing comes before you start painting and you’ll need a waterproof pen so that the ink doesn’t run (I used a Pigma Micron pen which has the advantage that it doesn’t bleed onto the watercolor paper).

When your pen sketch is complete, mix some green using Raw Sienna and Phthalo Blue then start painting your leaves. Don’t worry about painting accurately, it doesn’t matter if you let the color spill over the edges of the line drawing, it all adds to the character of this type of painting, and it’s one of the benefits of line and wash.
I left the vein of the leaves white by avoiding to paint over them. You can vary your green color by adding some more Raw Sienna here and there. When the leaves are finished, paint the stem of the branch with a pure Raw Sienna color. Finally, mix some more blue-green paint and glaze some of the leaves, or just half a leaf with a darker green, to increase the intensity of color. Don’t paint all the leaves, just a few to give variety.
5. Simple Watercolor Pebbles Composition
Things you’ll learn: Create a three dimensional appearance by using values, shading and blending.
This project is a little more advanced because it’s a painting of a still life subject which involves basic shading techniques and casting shadows.
Rather than just painting flat abstract shapes, this time you will portray three dimensional form through the use of values and blended shading.
Values are a very important concept for representing real life subjects. Value is also referred to as tone, and simply means differences in hue from light to dark. Tonal value describes how light or dark a color is and if you get the values of your painting right, you can convey a credible sense of space, light and form.
As an example of how to use values to express three dimensions, here’s a breakdown of how to shade a spherical form with watercolors.
Shaded Watercolor Sphere Exercise

The intensity of the values is built up from light to dark. the highlight of the sphere is the lightest tone and has been left white so that we can see the paper underneath (this is known as reserving the whites). A light wash is applied over the rest of the sphere.
Once the first layer of paint is dry, another wash is applied to intensify the tone, making sure to leave a lighter zone around the highlight. This wash has been blended to try and get a smooth gradient. You do this by rinsing your brush, blotting off some of the water, then using the brush to smooth out the wet paint.
Leave the paint to dry again, then apply a new darker wash of paint to the shaded half of the sphere. Again you need to blend this wash to get a smooth edge.
Let the paint dry again, then lay down a final wash over the darkest third of the sphere, blending the edges of the paint like before.
Finally, you can add a dark wash to the area of cast shadow. This time leave a non blended crisp edge to the shadow shape.
Watercolor Pebbles Painting

The shading and shadowing produced in the above exercise is the same concept you will use to paint this simple pebbles painting. I want to get you to think about values. We want to leave a bright highlight, add shade to the pebbles, add shadow on the body of the pebbles, and also paint any shadows cast by each pebble.
I used a series of different greys for the pebbles which have more blue or brown depending on the color appearance I wanted. Also some of the washes are more diluted to produce lighter or darker toned pebbles. The paints I used were Prussian blue, Raw Sienna, Burnt Sienna and Burnt Umber. Try different mixes to see what kind of grey hues you can produce, but make sure your paint is not too thick at first, because you want the initial washes to be lighter in tone so that you can add shading later.
Paint a different colored wash on each of the pebbles. Some of them can have variegated washes as you can see in the final painting. I left a white highlight on each stone using a dry brush around the bright highlight to get a dry brush effect. This is good for suggesting texture. Let the stones dry before moving on to the next part.
Now you can add blended shading to each of the pebbles. Paint a glaze over the underside of the pebbles and then smooth the edge of the wash.
To do this, rinse your brush by dipping it in rinse water, blot it dry (but not completely dry), then pull out the wet wash you just painted. Your brush should not be completely rinsed and some color will remain on the brush head, but it will be diluted compared to your first wash. You need to blot the brush because too much water will cause a backrun, where the water will flow back into your settling color.
Next you can add some cast shadows. Each pebble casts a shadow on the pebble beneath. Paint these using a glazing technique. Let your painting dry completely first then add dark grey shadow forms with hard edges.
You may notice at this stage that there’s a big contrast between the dark shadows and the shaded underside of the pebbles. If this is the case, add some more blended shading to the underneath of each stone until you’re happy with the result.

Taking things further
How do you improve your skills with watercolor? I would encourage you to continue to practice your technique, but also learn what you can about the theory behind this amazing artform. The more you read, the better you’ll understanding how to control your paint to produce a desired effect. If you want to get a better grasp of watercolor painting here are a couple of articles which may help:


This is great! I needed a few starting exercises for my watercolor students and these are great! Thanks for posting. This will work well for remote teaching and I can see my students having great results. Thanks for making these.
Thanks so much I enjoy this style of tutorial very clear and precise easy to follow
I’ve been doing watercolor for not yet a year and am in my 40’s. It’s been such a joy. And this post is so helpful! Thank you for sharing your knowledge and so many wonderful tips!
You’re very welcome Kim – have fun painting!
Thank you for the information and paintings I’m only starting out and can’t wait to try your techniques.
I have been painting watercolor for 3 months. Your information on colors is invaluable. I look forward to your tutorials. Thank you
Happy to help Linda…
A lovely lesson. Thank you. Now nag me into STARTING!!
Hehe – try signing up to my newsletter for free watercolor lessons – maybe that will get you started !
Thanks so much for this tutorial!!
I’ve been painting for a few years and am basically self taught. I think I’ll always consider myself a beginner as there is so much to learn!! This has been hugely helpful. There is so much to wade through in books on techniques I could spend more time reading than painting. Thanks for being concise!! Very helpful!
Great tutorials thank you! So helpful. I especially appreciated the sphere’s and pebbles. Thanks for sharing your expertise.
Glad to help !
So helpful. I’ve been struggling with understanding washes and now I think I get it. Can’t wait to try the techniques.
Janet
Thanks janet – Have fun experimenting with your washes!
Awesome tutorial. Thank you. You just forgot to explain what dry brush is. Thank you again.
Thanks Ana. You’ll find more about the dry brush technique here:
https://www.watercoloraffair.com/10-essential-watercolor-techniques-for-beginners/
Thanks for this tutorial??
You’re welcome Linda!
Amazing tutorial with guided step by step pictures. Thanks for sharing.
You’re welcome Jena – enjoy your watercolors!
This has been vey helpful. Thanks for sharing.
thank you for shraring.. love your information, it makes me really want to grab the brush.
Yea! Go splash some paint Maya!
What a wonderfully fresh tutorial. You made going over the basics fun and inspiring. I am certainly not putting the brush down any time soon if you keep tutorials like this coming our way.
Thank you, thank you thank you!
An extremely grateful fan!
that’s very kind of you Silvia – more stuff coming as soon as possible!
These are really great exercises for progression. Thank you. I completely agree that your step by step methods with visuals and written instruction is the way to go for the beginner. Do you have a You Tube channel? I would love to take an actual class with you. I am a visual learner and you are a terrific teacher. Keep the lessons coming. Your viewer base is obviously looking forward to new tutorials in the new year.
I’m certainly thinking up some new ideas for articles in the new year! At the moment I just want to spend my time painting 🙂
Thank you for sharing your knowledge. You bring joy to who knows how many!
Thanks – Happy to know you enjoyed the article…
I’m learning so much with your tutorials. You help me progress and enjoy watercolor painting. Your information and exercices are so interesting. I read everything you publish on this site. Bravo!
Thanks for the complement 🙂
more coming in the future !
Awesome tutorial!!
Thanks !!
That was a LOT of fun . . . . thanks man!
Thanks Leon – go grab a brush and enjoy yourself !
I’m really impressed with your tutorial style. Great blend of text, step-by-step images and notes on images with arrows. I watch a lot of these, but your style has me wanting more. Please do more- you’re really onto something here. Cheers Christine (Melbourne, Australia)
Hi Christine. Thanks so much for your comment. I’ll be churning out more stuff in the near future 🙂
What a nice way to teach steps for perfection
Thank you! Happy painting !
These tutorials are absolutely amazing! Clear and concise, easy to follow and yielding great results. Thank you so much for sharing I’m looking forward to others. -Pamela Brown
Thanks for your kind words Pamela… I’ll be posting more as soon as I can !
Nice and brightly explaind.
Glad you enjoyed it Lille!
Loved this. Thank you for sharing.
Thanks Geri