
Unmissable Watercolor Techniques (EVERYTHING You Need!)
Welcome to my comprehensive guide to help you understand and master watercolor techniques.
To be honest, when I read what other websites are writing about this topic, half of them don’t seem to understand what they’re talking about!
I don’t mean to be fussy or seem arrogant, but some of them are incomplete.
Others get the terms wrong 😕
A few are only half-correct!
So this is my stab at putting things right.
The painting methods described here are complete and accurate. And to explore them in more detail, I’ll link to other lessons specifically dedicated to each one.
A valid, authentic, authoritative guide to watercolor techniques 🙂
Happy?
Okay… Let’s dive in!
What are the Different Watercolor Techniques?
Watercolor techniques refer to how you apply (or sometimes remove) paint to create a specific artistic effect. Watercolors can be used in an amazing variety of ways. There are a handful of classic and widely-known painting techniques and also some less familiar methods.
Each technique requires a certain level of skill to pull it off successfully! Some are trickier than others… Some are very simple.
This incredible variety of ways to paint gives watercolor artists a huge creative vocabulary 🙂
Below I’ll introduce you to the best-known watercolor painting techniques and some more fun and inventive ways to use your watercolors.
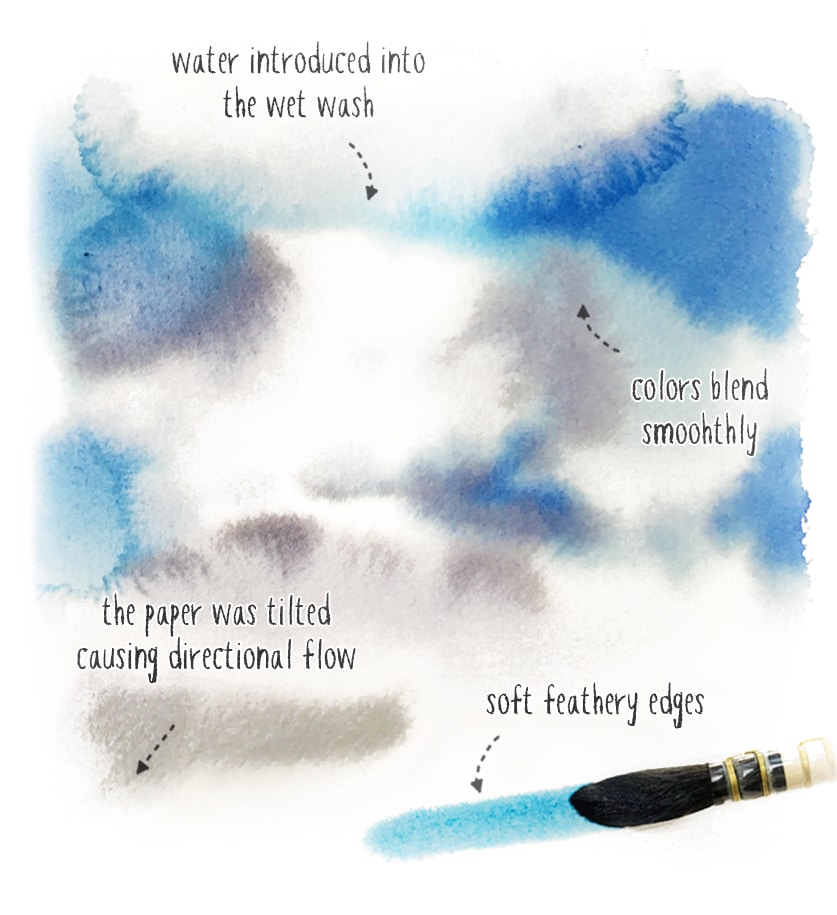
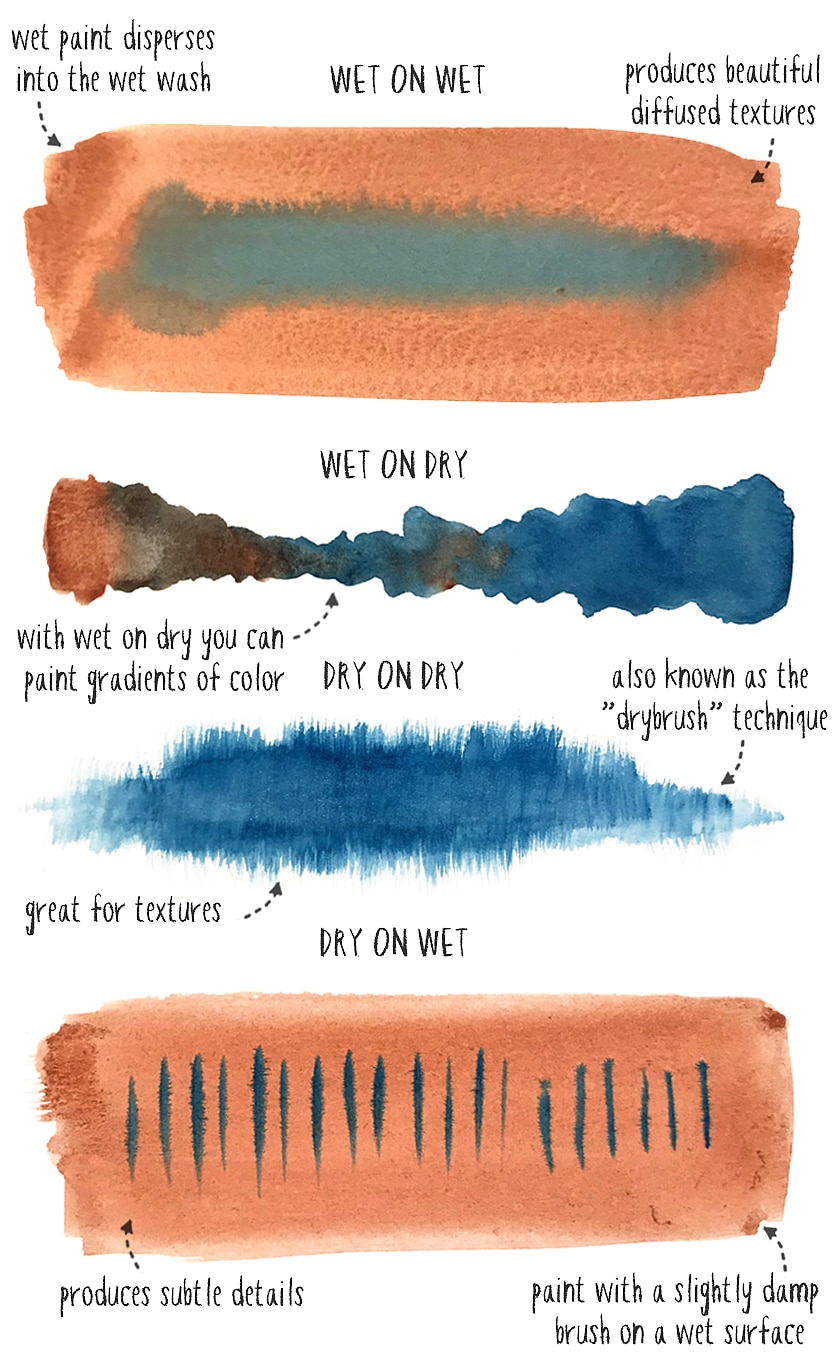
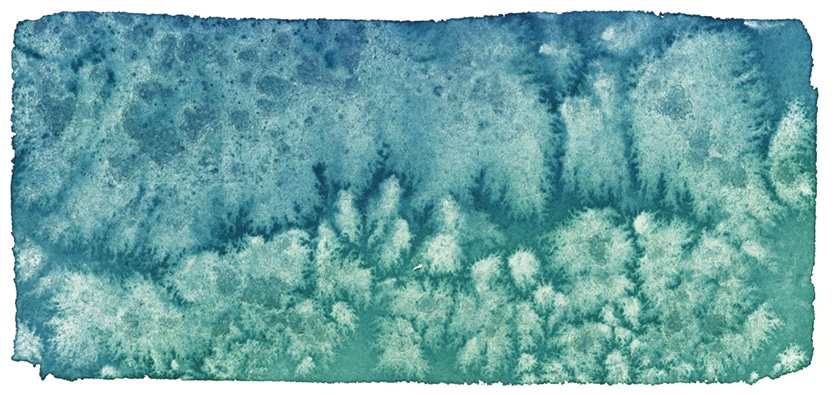
1. Wet-on-Wet Watercolor
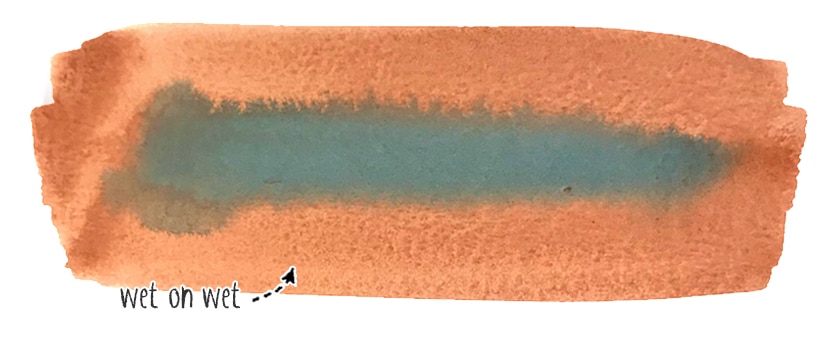
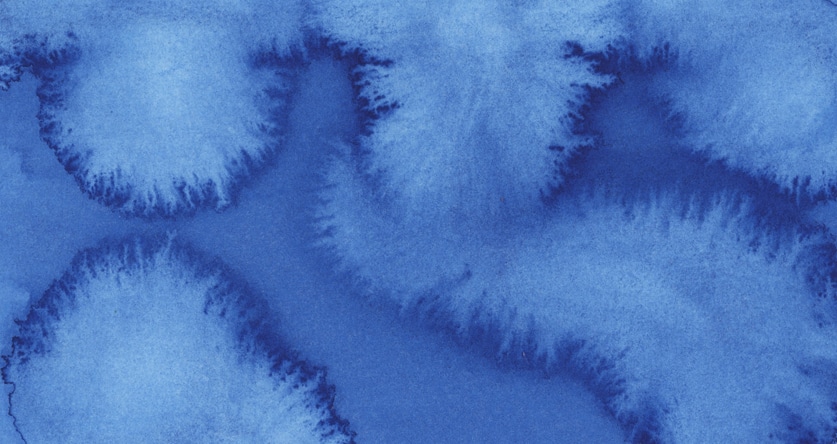
Wet on wet is a beautiful technique for producing amorphous shapes and soft edges. The term “wet on wet” means exactly what its name implies, you apply wet paint onto a wet surface. You begin by dampening the paper’s surface with clear water and then charge the water with pigment from a loaded brush. The resulting washes have soft, blended edges. Colors run into each other to create beautiful textures.If you drop a new color into a previously laid wet watercolor wash, the fresh paint tends to push the existing pigment around. As the paint dries, the colors bleed together. Adding paint in this way is a specific technique known as charging. I’ll cover this in more detail below…
The downside of this wet-on-wet is the lack of control. Pigments spread according to the wetness of the paper and not just in the areas where you apply your brush.
- If your paper is very wet, the spread of the paint will be significant.
- If the surface is slightly damp, the color will spread over a very short distance.
With a bit of experience, you can use the different stages of paper wetness to produce the desired effects.
The large amount of water used for this method of painting can cause watercolor paper to buckle and wrinkle, sometimes making it difficult to paint properly. Unless you use heavy watercolor paper, I suggest you stretch your paper to avoid this.
This technique is only helpful for soft blurry forms, and you won’t be able to paint well-defined shapes. For example, it’s ideal for painting clouds!
2. Wet-on-Dry Watercolor
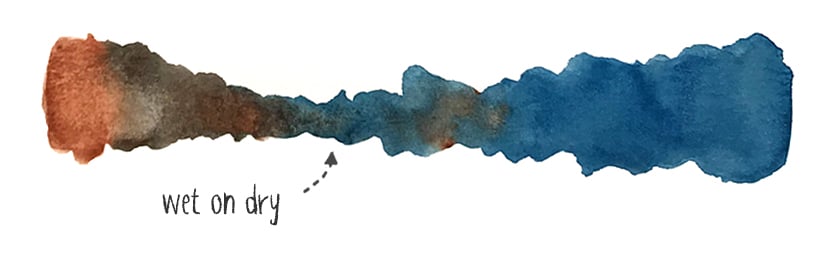
The term wet on dry means precisely what it says. With this technique, you apply wet paint onto a dry surface. The surface must be dry, whether you’re painting onto clean white paper or a previously laid wash of color.
Wet-on-dry is a fundamental watercolor technique, and probably the method of painting artists use the most often.
For this reason, it’s a method that demands some patience. You must wait between brush strokes, so your next mark doesn’t bleed color into the underlying layers of damp paint.
Watercolor paint always dries lighter in tone than when it’s wet. As a result, the first washes you lay on paper often appear light and flat. Watercolor artists usually build up depth and intensity of color by applying successive layers (this technique is termed glazing – see below). In this way, you can add darker values and richer colors with texture and interest.
One of the tricky things with this dry surface technique is when you want to paint large areas of colored wash. If the paint dries too quickly while you’re working, you can end up with unwanted streaks in the wash area. You need a good grasp of flat and graded wash techniques to overcome this problem (see further down).
The use of wet on dry doesn’t exclude the use of other painting techniques. For example, you will often see artists combine an underlying wash of wet on wet with wet on dry details, which gives sharper edges.

You can use wet on dry to produce crisp, sharp edges. In fact, it’s probably the only way you can add detail to your work. Moreover, it’s a technique favored by artists who enjoy precision.
Because of the liquid nature of watercolors, the paint will flow to wherever there’s moisture. If the surface is completely dry, there is no flow, and the brush marks remain where they are placed. The paint will stay within the boundaries of the wet brush mark.
But this doesn’t mean wet on dry is only used for sharp-edged shapes. You can also produce smooth edges to shapes when painting wet on dry. For this, you must learn how to blend watercolor paint with a wet-on-dry method.
For a deep dive into wet-on-wet and wet-on-dry painting techniques, read this article here…
3. Dry on Wet Technique
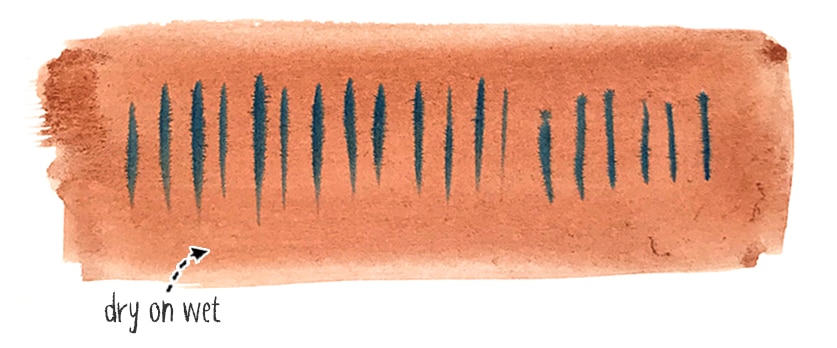
The technique of “dry on wet” is hardly ever mentioned!
This technique isn’t often talked about, but it can be used to create beautiful subtle shapes.
The term “dry on wet” is perhaps slightly misleading. It implies a dry brush on wet paper. But of course, your brush is bound to have some wetness if you have paint on it. However, to apply this technique, your paper should be wetter than your brush.
To do this effectively, you should use paint that is only very slightly diluted with water. I’ve even seen some artists apply paint directly from the tube into a wet wash.
The advantage is that you can create subtle details and depth in a painting. And because your paint is almost non-diluted, the color appearance of the shapes will be more vibrant.
Give this technique a try. Of course, you have to keep a close eye on the wetness of both paper and brush, but it will also help you become more familiar with your paints.
4. Dry on Dry Technique
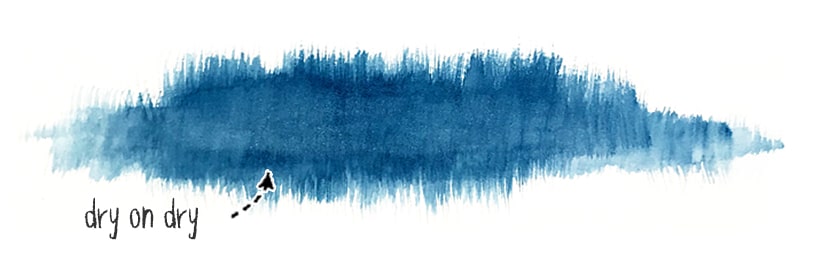
Dry on dry is when you paint with a very dry brush onto dry paper. (It’s very similar to Dry brushing – more details further down)
Dry on dry is excellent for adding textured brushstrokes to your artwork. When you drag a dry brush across the surface of watercolor paper, the paint will drop onto the raised bumps of the paper, but the lower indents of the textured paper remain white. For this reason, I find that the technique works best on rough watercolor paper.
Artists often use a flat brush for this method. Test your brush on a spare piece of paper to ensure you have the correct moisture level on the brush. If you’re using a round brush, you’ll get better results by painting with the side of the brush rather than the tip. Hold the brush almost horizontal and skim the brush head over the paper.
You also need to move the brush over the surface quickly.
This technique is great for adding texture and can be used to imply movement to a subject.
By the way, to better remember these terms, note that the first word refers to the state of your brush, and the second word refers to the state of your paper. So « wet on dry » means a wet brush applied to dry paper.
5. Charging-in (Feathering)
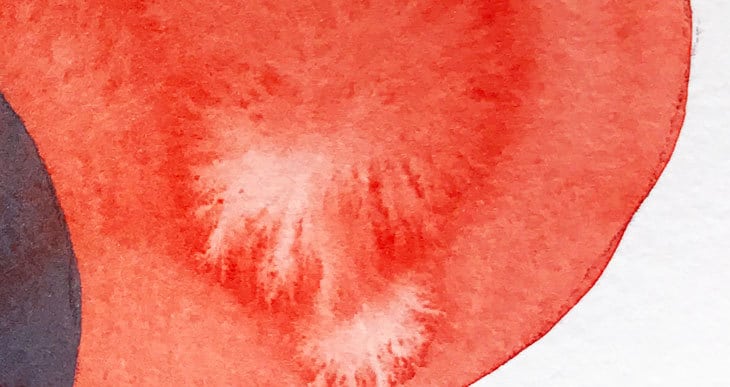
Charging is a technique of dropping watercolor into a damp surface. Also sometimes called the feathering technique (I suppose because of the feathery textures produced as the paint disperses).
This is a widespread painting method. I always use this to add smooth variations of color in a shape. You can start with a form damped with clear water or drop paint into a moist, colored shape.
This is essentially a wet-on-wet technique. The wetness of both paper and paintbrush changes the resulting effects.

6. Glazing
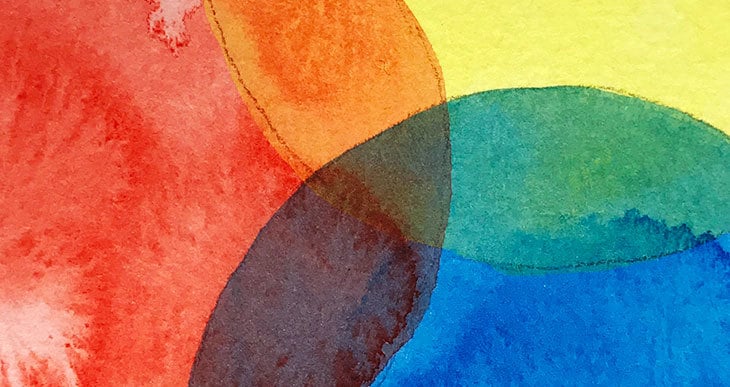
Glazing sounds like a complicated technique, but it’s actually quite simple. Glazing is another word for “layering.” The notion of layering in watercolors is essential, as you’ll probably discover the more you paint. Unlike a lot of other art mediums, watercolors are transparent. This means that each brushstroke you lay down on paper is visible underneath every subsequent layer of paint. This transparency is what gives rise to the technique of glazing.
There are a few important things to keep in mind about glazing:
- Each layer must be left to dry before applying a new wash of paint. For this reason, glazing is essentially a wet on dry painting technique. (Wet on dry basically means applying wet paint to a dry surface). Painting on a damp surface produces different results and would be considered a wet in wet technique.
- When you glaze, the natural transparency of watercolors affects the color appearance of a painting. Each new layer alters the color of the layer underneath. If you glaze with different colors, you are basically mixing colors on the paper.

As a beginner, I think the best way to approach glazing is to build your paintings gradually by working from light to dark. Applying several layers of watercolors develops the depth and intensity of the painting. Always paint your very lightest tones at the beginning of a new painting using thin, diluted washes rather than strong, thick paint. Each new layer of paint progressively increases tonal values and modifies colors. Applying multiple glazes helps control shifts in hue and tone.
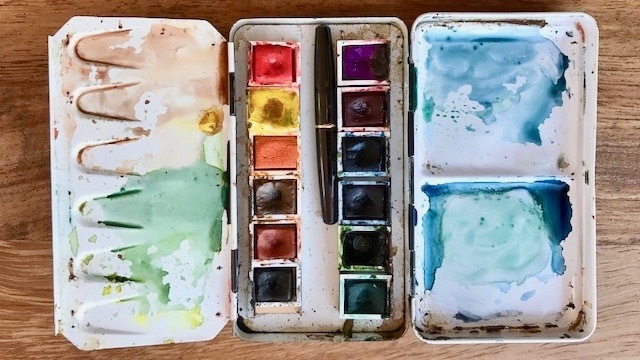
It’s often a good idea to test the color palette you intend to use to see the effects of color mixing. I recommend you do some color preparation on a separate sheet of watercolor paper before starting a new project. This helps you judge the transparency of your chosen colors and how the colors will mix when layered.
You can do this by creating a quick glazing chart at the beginning of each project, or if you want to get to know your paints better, make a big reference chart for all your colors!
Like this one:

Read this article for a more detailed discussion of watercolor glazing.
7. Watercolor Blending Methods
Blending (going from dark to light) is one of the most challenging techniques in watercolor. It requires a certain amount of brush control and a well-practiced technique. But blending is essential for gradually transitioning from one tone or color to another and giving your artwork a sense of three-dimensional form.
Any shape you paint with watercolor tends to form a hard edge when it dries. Lines and edges will appear unless you smooth out and blend the border before the paint dries.
What makes blending with watercolors more complex than other mediums is that watercolors dry more quickly.
Blending with watercolors can be achieved using either wet-on-dry or wet-on-wet techniques.
The advantage of wet-on-wet blending is that the paint stays wet for longer, giving you more time to play with the paint and blend colors together. However, wet-on-wet blending can be unpredictable. You have less control over the movement of pigments, and paint can spread slightly haphazardly. With experience, you can gain a certain amount of control over wet-on-wet blending if you learn to use different degrees of surface wetness to increase or limit the paint flow on the paper.
Wet-on-dry blending can be achieved by pulling out a color with a clean blotted brush.
Let’s say you paint a flat shape onto dry paper, and you want to blend one edge. Paint will only flow where there is moisture. So you need to encourage movement by expanding the shape with your brush. If you continue to paint with a brush loaded with paint, you’ll just increase the size of your wash area.

Rinse your brush, then blot it on a paper towel to remove most of the moisture (If you use a brush loaded with clear water, you will get a backrun that produces a feathery pattern in your damp wash). Next, brush the edge you want to blend and pull the paint outwards with the moist brush. The pigment will disperse into the dampness and will be diluted in strength. Continue to clean and blot your brush repeatedly and brush the edge until it blends completely.
All of this needs to be done relatively quickly before the paint has time to dry.
I have an article dedicated to how to blend with watercolors here…
8. The Flat Wash
When artists talk about a flat wash, they mean an area of paint with uniform color and tone and no visible brush marks. This is a very satisfying technique to apply, and once you grasp the basics, it’s not too difficult. It just needs a little practice.
To perform a successful flat wash, there are two different methods that most watercolor artists use. Perhaps the most frequent is to use a wet on dry approach. But it’s also possible to make a great flat wash using a wet on wet technique.
You can make a quick comparison of the two techniques for yourself. Before painting a flat wash, you should mix a good quantity of paint , so you don’t run out while laying the wash.To paint the wet on dry flat wash, you paint with alternating horizontal brushstrokes, starting at the top of the paper and gradually working your way down. Then, move the brush from left to right and tilt the paper at a slight angle so that the wet paint flows downwards. This action creates an excess of wetness at the bottom of the brush stroke, known as a bead. Keep loading your brush with fresh paint, so you always have a bead of moisture, and carry this bead to the bottom of the page.

With the wet on wet technique, there’s no need to tilt the paper. Instead, you begin by dampening the whole of the paper, which encourages the paint to flow across the surface and blend smoothly. There is no particular style of brush stroke needed. Just paint the wash area all over before the wet paper has time to dry. If the wash seems uneven, you can incline the paper in whatever direction is needed to spread the pigment around more uniformly.

Always blot up any leftover bead or wetness with both techniques to prevent a backrun from forming. The wet on wet technique gives you more time to play with the paint since the paper takes more time to dry. But the heavily soaked paper will tend to buckle, so you may need to stretch the paper before laying this wet wash.
9. The Graded Wash
A graded wash is the next level up in difficulty compared to a flat wash technique. A graded wash changes gradually in tone from darker to lighter. The transition should be smooth, and as with a flat wash, individual brush marks are not apparent.
Graded washes can be painted wet on dry or wet on wet. The method is practically the same as for a flat wash, but instead of applying the same strength of paint over the entire wash area, we gradually add clear water to the paint mix so that it becomes more and more diluted.
Try both methods to see what you think. It’s sometimes easier as a beginner to use a wet-on-wet technique because of the extended drying time, but I encourage you to practice both. After all, practice makes perfect!
Begin your washes in the same way as described above. When you want to start the transition, add a couple of big brush loads of clear water to your paint mix. Use this new diluted mix to continue the painting underneath your full-strength wash. Keep diluting and moving down the page until you reach the bottom. You can even use clear water for the final brush strokes if you like.

Don’t forget to mop up any remaining moisture (even if it’s clear water) to avoid a backrun from forming at the base of the wash.
10. The Variegated Wash
A variegated wash is an area of color that changes in color and value across its surface. You can mix as many colors as you want with this technique. Watercolor artists use this method often for creating attractive shifts in tone and blended colors.
The technique used is very much the same as for painting a flat or graded wash, and you can apply either a wet on dry or wet on wet method. The colors bleed together in a slightly unpredictable way producing very appealing results.

One quick tip… Ensure you have a good quantity of each color prepared before you start painting. You don’t want the paint to start drying, or the wash will end up with streaks or blotches!
11. Watercolor Masking Techniques
With watercolor painting, the purest form of creating white is by reserving whites so that the white of the paper is free of paint. It’s the white paper that generates the light tones in a painting. The most effective way to achieve sparkling highlights or bright white shapes is to reserve them by painting around them or by using masking techniques.
The transparent nature of watercolors allows the white of the paper to show through, and darker tones are only achieved by applying more layers of darker pigment. For this reason, it is important to plan where you want the paper to remain white. Sometimes it can be a big help to make a value study of your subject before painting the final artwork. This helps you anticipate where the paper needs to stay white.
There are a few different ways of reserving white. The first is simply to paint around any white shapes. Painting around a form with a wash of color will leave a hard edge.
However, painting around complex objects is more tricky. So, in this case, you may need to use masking fluid (also known as frisket). Masking fluid is basically liquid latex that is painted over the area you want to protect.
Once the masking liquid is dry, washes can be painted over the top. After letting the paint dry completely, you can remove the masking without damaging the paper. The masking frisket can be painted in any shape you like.
You can read more about how to use masking fluid in this article…

12. Lifting Off Watercolor
Another alternative for achieving white in watercolor painting is to remove paint from the paper surface after painting. This can be done by lifting off.
For example, you can lift pigment off the paper using a clean damp brush. You can do this while the paint is still wet or to a certain degree after the color has dried. Your brush should be damp but not soaking because you want the brush to wick paint from the surface.
13. Blotting Watercolor
Watercolor blotting is an extension of the lifting technique. Blotting uses various tools to remove paint from the surface while it’s still damp. Anything absorbent can be used to soak up paint, but artists commonly use kitchen towels, kleenex, or sponges.
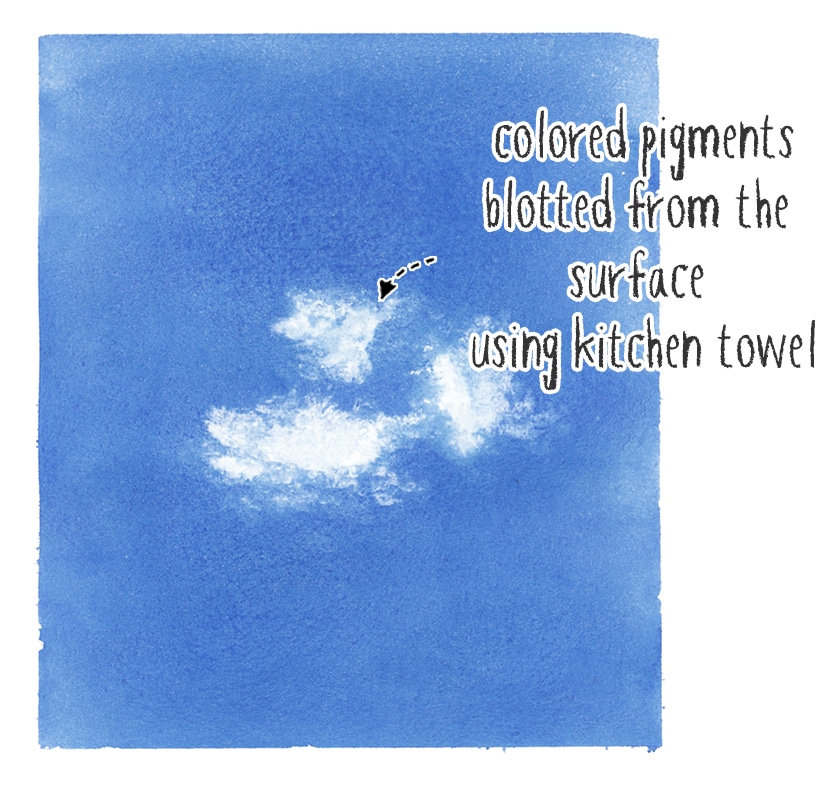
Lifting is commonly done with a brush, which allows a lot of precision and detail. But blotting allows the artists to remove broader areas of paint more quickly.
For example, this is a common technique for creating cloud shapes in a big blue watercolor sky wash 🙂
14. Scratching Watercolor Technique (Sgraffito)
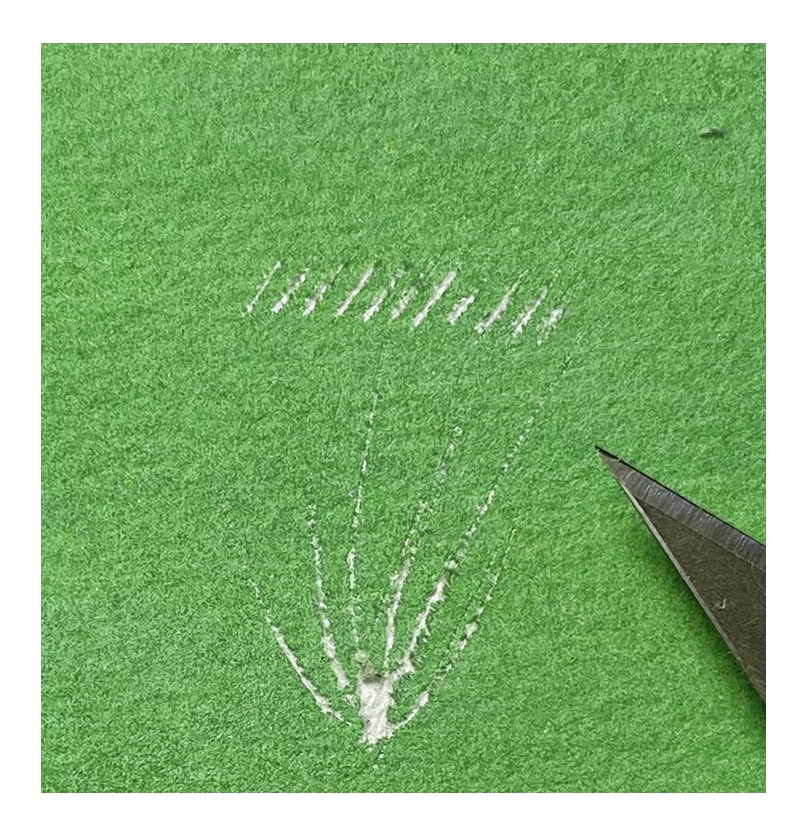
Scraping the paint off the surface after the color has dried is a technique also known as “sgraffito.”
Scraping is done with sharp or abrasive objects, but artists usually use a razor or scalpel. However, be careful with this technique since it tends to damage the paper.
This is useful for adding linear highlights of color to a previously painted shape. A good example would be adding lighter strands to a painted grassy area.
Lifting, blotting, and scraping techniques are discussed in more depth in the following article:
“Lifting blotting & erasing watercolor.”
15. Watercolor Resist Techniques
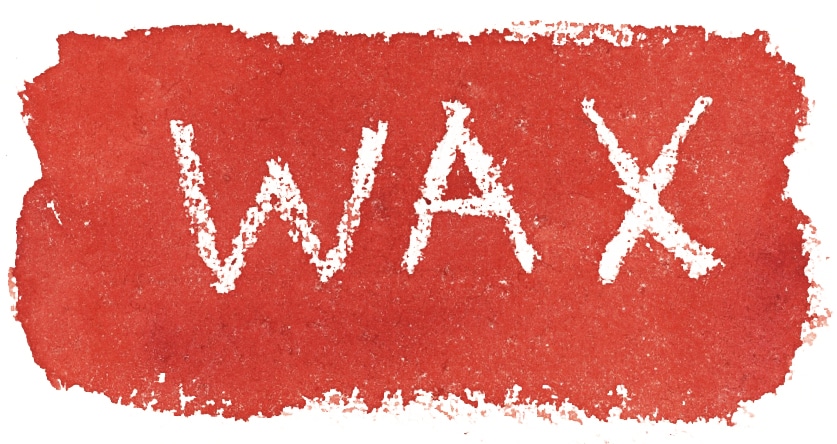
Artists occasionally also use wax resist. With this method, you draw over the area which needs to stay white using clear candle wax.
I’m sure a lot of us did this kind of artwork when we were kids 🙂
The effect was almost like magic. After crayoning on the paper surface, any paint is repelled by the waterproof wax lines…
This is a quick and fairly accurate way of reserving white, but the downside is that the wax remains on the paper!
You can buy wax resist crayons in bulk here (Amazon)
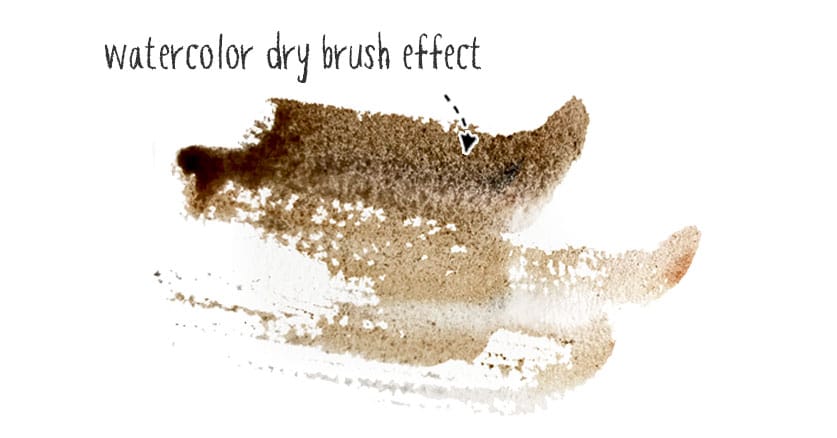
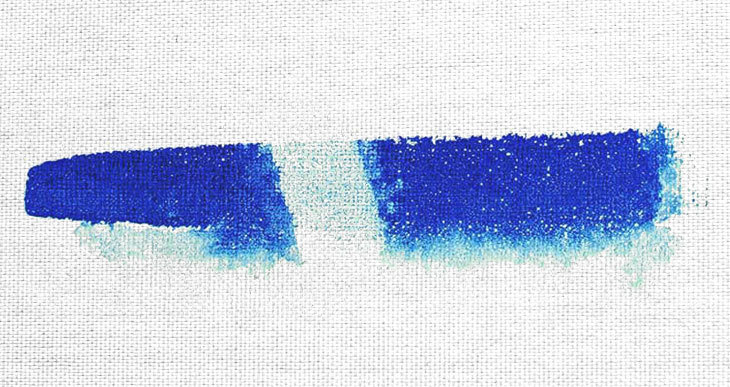
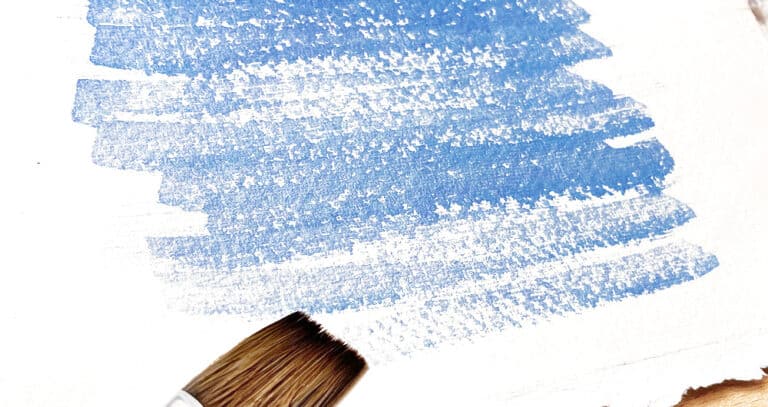
16. Watercolor Dry Brush
Dry brushing literally means painting with a dry brush so that color only partially covers the paper. This brushing technique produces broken lines of color and is very effective for adding texture to a painting.
I would recommend you use this technique in combination with others. As an example, the artist Chien Chung Wei uses this technique beautifully. Try looking him up!
To get the hang of this brush method, it’s well worth grabbing a few spare sheets of paper and experimenting. Generally, it works best on paper with some texture, so rough or cold-pressed watercolor paper is ideal.
It can be quite punishing for your brushes, so don’t use your best ones! Also, it tends to work better with stiff brushes. Goat hair is a good option, or some sort of bristle brush.

As you might have guessed, the wetness of the brush needs to be controlled for this technique to be successful. Also, you need to move your brush with relatively rapid linear movements. As your brush skims across the paper, the dry paint adheres to the raised textured paper surface but doesn’t sink into the crevices.
I have a full article on the dry brush watercolor technique here…
17. The Light-to-Dark Approach
Painting light-to-dark is a watercolor method that most watercolorists employ to gradually build up a subject.
As mentioned in the section about glazing above, working from light to dark is a very effective way to use this medium, in particular, because of the transparency of watercolors and the layering effect of successive washes of watercolor.
The more layers you add, the darker the tonal value becomes. This lets you add depth gradually to any subject. It can take a bit of getting used to. Still, after a while, you find yourself breaking down a subject in your mind into shapes of lighter and darker values so you can apply this technique.
I have a complete article dedicated to this approach here…
18. Underpainting Watercolor
Underpainting is about laying down a foundation of color at the beginning of the painting process. Because watercolor is transparent, the chosen colors for underpainting affect the color appearance of the final work.
This is similar to the concept of glazing, where the final color appearance depends on the combined layers of pigments.
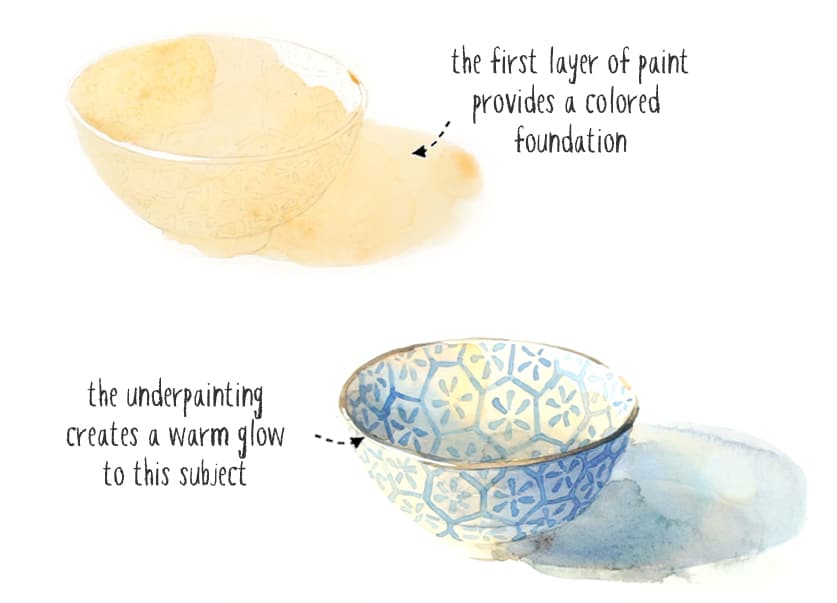
This technique can be used in all kinds of subjects, but it’s a popular method in landscape painting. For example, a cool blue-gray underpainting creates a cool mood in a scene. Whereas a warm underpainted wash conveys a warmer atmosphere to the finished work.
You can see an example of using underpainting in this tutorial.
19. Negative Painting Techniques
Negative painting in watercolor is where you focus on the shapes around an object rather than the object itself. Subjects are made up of both positive and negative forms. Generally, the subject is the positive shape, and the surrounding space is the negative shape.
So painting into the shapes surrounding the object means you are painting the negative space. This is “negative” painting.
This is often used when the focal point of a painting is light-valued, and the background is a darker tone. By painting the darker “negative” background shapes, you reveal the shape and form of the lighter “positive” forms.
You can find an in-depth lesson about negative painting here…
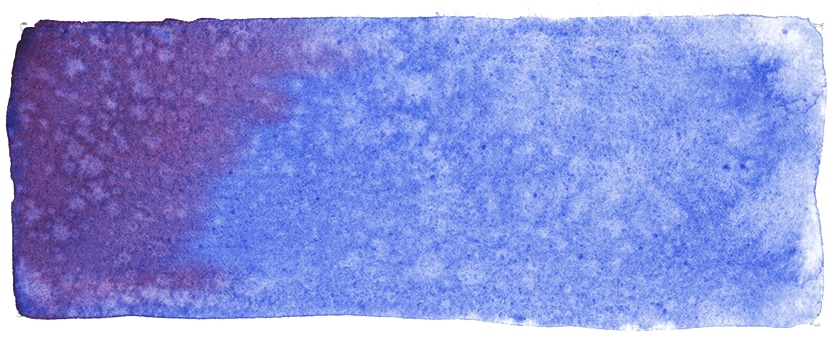
20. Watercolor Salt Effects
Using salt on watercolor is a method of adding texture to a painting. Salt has absorbent qualities. To use this technique, salt is sprinkled onto a wet wash of color, and the salt absorbs the paint in the surrounding area.
In this way, adding salt to a damp wash of watercolor creates bursts of feathery textures around the grains of salt.
Keep in mind that a variety of factors affect the outcome of this technique, including:
- The size of the grains and
- The type of paint you use
- The wetness of the paper
- The water-to-paint ratio of your mixed paint
For example, granulating watercolors produce a less-apparent effect since granulating paints are already “textured” in nature. On the other hand, non-granulating colors deliver a more pronounced effect when using salt.
21. Watercolor Spray Bottle Technique
I always have a spray bottle with clear water nearby when painting. It’s a quick and easy method for adding speckled texture to watercolor paintings. You can produce a splatter texture by vaporizing droplets of water into a damp area of watercolor.
When the water drops hit the wet surface, the water spreads outward. It pushes the pigment away, leaving behind a lighter-toned speckle on the surface. (This is the same phenomenon as “watercolor blooms”).
I like to use this effect on backgrounds…
22. Rubbing Alcohol Watercolor Technique
This effect works very similarly to adding salt or using a spray bottle. The alcohol repels the pigments on the surface of a colored wash, leaving a transparent spot of clear paper. However, the appearance is slightly different from using water splatters or salt. The resulting spots look more like bubbles or blisters on the colored surface.
Good tools to apply this technique are a dropper or a cotton swab (don’t use your best brushes applying the alcohol!) You can also get rubbing alcohol in a spray bottle and use it like a vaporizer.
23. Plastic Wrap Watercolor Effect
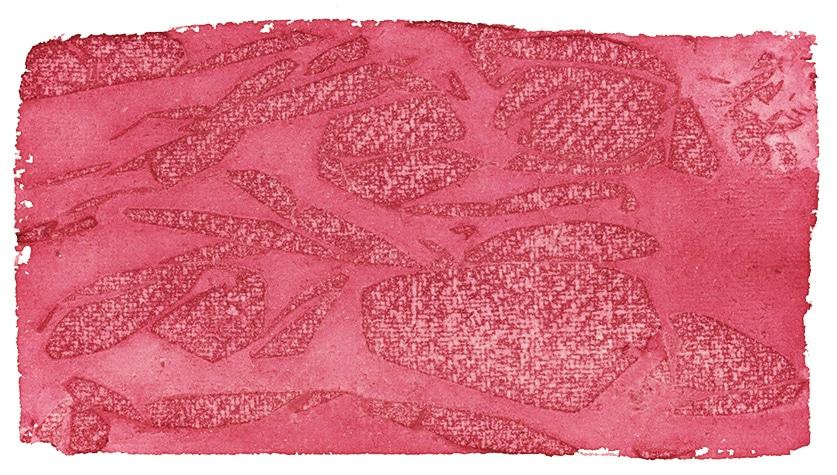
Everyday kitchen plastic wrap can make some fascinating textures. First, the plastic film is pressed into a wet shape of watercolor. Next, the film scrunches up and causes the underlying wet paint to follow the wrinkles of the film. Then you leave the paint to dry and remove the film.
The results are very abstract and random. It leaves patches of lighter and darker-toned shapes in the underlying layer of paint.
This texture technique can be used effectively to convey organic-looking forms. I’ve seen it used with great success on landscapes, for example.
24. Watercolor Dripping
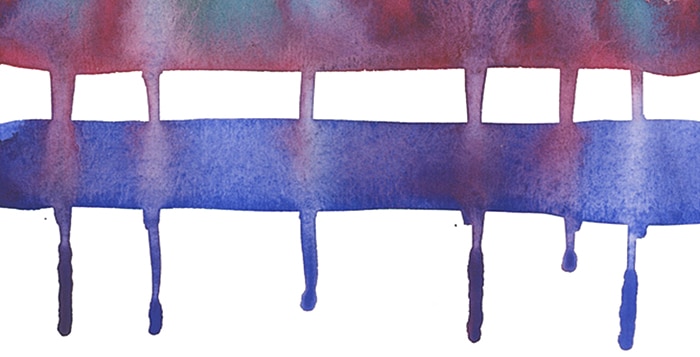
Dripping is a fun watercolor technique to add abstract flowing drips of color to a painting. A very wet application of paint can be encouraged to trickle down the page using the help of gravity.
This is more of an illustrative style of texture creation in watercolors. It yields a very interesting graphic look to a painting!
Watercolors’ watery, fluid nature makes this method unique compared to other mediums.
I’ve written a more detailed description of this approach here…
25. Watercolor Splatter Techniques
Watercolor splatters can be applied to make very subtle or dense patterns of spots and freckles of color. The most common way to apply this technique is to use a toothbrush, but any stiff-haired brush can do the job.
Load the brush with paint, then flick the brush with your index finger to splatter droplets of color on the paper surface.
This can sometimes be done with a round paint brush by vigorously flicking a loaded wet brush over the surface.
Soft watercolor brushes are less effective for this method. The hairs need some “spring” to snap back into place and fling the paint around!
26. Scumbling Watercolor
Scumbling is a brush technique for adding texture to your artwork. You use your brush with a dabbing and scribbling action to create patchy specks of color. Dabbing repeatedly in this way creates loose dots of texture that can be varied in tone or layered on top of each other. This technique is great for adding detail.
Scumbling is a technique that originates from oil painting. It’s used to add scattered dots of lighter-colored paint to create highlights. Because oil paints are opaque, this works well for creating areas of lighter color. But because watercolors are transparent, scumbling works differently. With watercolor, you begin light and finish dark. So scumbling is added in stages to create darker dots of texture over spots of lighter-toned paint or untouched white paper.
It’s an excellent technique for adding textures for masonry, fur, hair, feathers, leaves, foliage, etc.

Any brush can be used for scumbling, but generally, it seems to work better with short tufted brushes. If you find yourself stabbing and scraping quite hard, maybe don’t use your best brushes! Scumbling is a wet on dry technique. You begin by laying down base washes of color or an initial pattern of scumbling. These first layers must be dry before you start dabbing texture over them. Also, your brush should not be too wet.
It’s a straightforward technique, providing a good level of control. Use your brush to create irregular shapes any way you want by randomly dotting or stroking the paper.
Try experimenting with scumbling to see what effects you can get.
27. Watercolor and Ink Painting Techniques
Watercolor and ink pen is a very popular mixed media technique. The linear pen marks create a graphic style, and the watercolor provides shapes of color.
This is a great way to combine loose watercolor brush strokes and precise pen lines.
The two can be combined in any order:
- paint followed by ink,
- or ink followed by watercolor washes…
The pen ink must be waterproof, or the lines will bleed and spread into the watercolor wash. And the paper needs to be able to handle water. Mixed media paper or smooth hot-pressed watercolor paper are best.
You’ll find an overview of this technique here…
28. Watercolor Bloom Texture Method
Watercolor blooms (also known as cauliflowers or blossoms) are often viewed as a mistake. They occur when paint or water flows back into a drying wash, causing a feathery-looking texture.
But when you know how to control the appearance of blooms, this phenomenon can be deliberately used to add interesting texture to a painting.
The effect remains somewhat random and uncontrolled, but this haphazard quality is one of the beautiful aspects of watercolor!
I have written a complete tutorial about using blooms here…


Thank you for this comprehensive list of watercolour techniques. Much appreciate your effort.
Merci beaucoup pour cet article très complet.
Wonderful and comprehensive description of water coloring!! Thank you for sharing your knowledge!!🤩
Thank-you much for this very comprehensive overview of many watercolor techniques!
Anthony, I’m in the middle of moving house! Will I be able to access this information in future? Or can I download it?
Thanks for your clear explanations, a lot of instructors presume you know stuff.
Hi Angela
The blog is available to refer to any time you like 🙂
Jean 25 April 2021:
You are a great instructor. Love all the detail. Have you written a book? I would buy it.
Hi Jean
Thanks ! Nice of you to say. I haven’t written a book – only my watercolor foundations course.
cheers
great help for a beginner Thanks I will try these
This is great, thank you so much for sharing! Good info for beginners like me.
Very helpful and written for the novice which I really appreciate.
Hi! Thank you so much for this. It is a real gift that I appreciate very much. Now, to try it all out…art practice!
Hope you have fun practicing Lynn!
this is just what i wanted to know to get started. thank you so much.I hope I will get better now.Thank you .I will try soon.
Glad it was useful Madi !
I enjoy reading through and I think this website got some really utilitarian stuff on it! .
Thanks Lance – glad you found it useful…
Make a more new posts please 🙂
___
Sanny
Hi Sanny
I’ll be writing more new articles soon !